Exporting Your Historical Sold Listings From Pillar9
In British Columbia, real estate website developers are specifically not given access to sold listing data which means that we cannot automatically import your sold listings. By following the guide below, we are able to import all of your historical sold listings in one go. This is the best possible solution we can offer without having access to the raw data.
⚠️ Proceed Carefully
Please follow each step very carefully, as a small mistake will result in unusable files
Here are the steps required to export your sold listings from the Pillar9 system powered by Matrix, and to send them to us for your website:
- Creating a custom template for exporting the Solds
- Generate your Sold listings
- Exporting your Sold listings using the Custom Template
Part 1: Creating a custom template for exporting the Solds
Log into your Pillar9 system: https://pillarnine.clareityiam.net/idp/login
A) Click on the Matrix MLS System button to open your my matrix page.

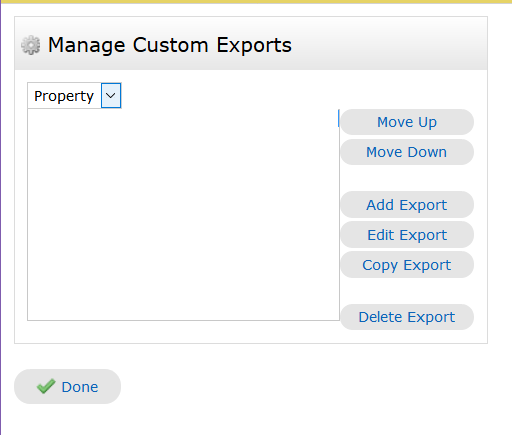
B) Click on the My Matrix tab and click Settings then click Custom Exports

Click "Add Export" from the right side of the box.
D) On the next page you will see a list of Available Fields on the left, and an empty box on the right. Before you do anything, name your Export "Historical Solds" or something you'll remember.
E) You need to add 19 of the items on the left to the box on the right. You do so by typing in each of these 19 items in the "Search:" box under the left list of "Available Fields." When the item you're looking for shows up, click it to select it, then click the "Add->" button in between both boxes. This will add your selected item to the list on the right (Export Fields.) You need to do this 19 times and add each of these items from the list on the left to the list on the right.
The 24 items you need to move over are listed underneath the following animation:

- Beds
- City
- Latitude
- Listing Contract Date
- Close Date
- MLS#
- List Price
- Longitude
- Public Remarks
- Close Price
- Street Address
- Total Baths
- Year Built
- Property Sub Type
- Subdivision Name
- Liv Area SF
- Structure Type
- Co List Office Name
- List Office Name
F) Make sure that next to "Include Column Names:" you have ☑️ the "Name" radio button, and next to "Separator:" you have ☑️ "Comma." See the animation above for visual aid. Once you've named your export, added all 19 items to the right box, and checked the correct radio buttons,

This would be the final look once you're done adding the export fields.
G) click "Save" at the bottom.
Part 2: Generate your Sold listings
Generate your sold properties using the Matrix Search
2A)
From the top of the page, scroll over "Search", select Residential.

2B) On this page, you will see a whole bunch of search criteria.
Only Check the Sold box then erase the default value of (0-180). This means we are generating all of your sold listings, not from the past 6 months. You can also set your preferred date range here.

2C) At the lower part of this page, click on add/remove beside additional fields.

2D) Add the following Fields My Listings(List Side) and My Listings (Buyer Side) the click back.
 2E) Now we have two fields for exporting. Check My Listings(List side) to export your Solds where you are the Listing Agent.
**IF REPRESENTING AS A BUYER (You can comeback here and export also the files where you represented as a buyer. Check My Listings (Buyer Side).
 2F) Finally, click the Results button to see the actual sold listing data then proceed to last part of the guide.
Part 3: Exporting your Sold listings using the Custom Template
A) Once you've reviewed the information, Select All of the listings by ticking the check mark in header.
B) Scroll to the bottom of the page and click "Export" from the small menu.

C) In this export page, select the export template we created earlier. In the guide we called it "Historical Solds". I hope you remember your template earlier.
Then just click Export.

D) Finally chose your download folder and save the exported .CSV file. You can rename the file accordingly to indicate if you are the listing agent or if you are the buyer.
***If you need to export your solds where you represented as a buyer please go back to step 2A***
Send the Exported File to the Ninjas
The file you just Exported should be titled Historical Solds.CSV, and should be saved directly to your Downloads Folder, unless you specified a different folder on your computer. E-mail the .CSV file you just downloaded to support@realtyninja.com and we will add them to your website.
* *NOTE** If the files you have downloaded are more than 10MB in size, please use this free service to send us large files: http://realtyninja.wetransfer.com
Also please note that it can take up to 5 business days for us to import your sold listing data once we have been provided with the files in the correct format.
Please feel free to contact us if you have any questions on how to use this guide.